Monday, November 9, 2009

Felted Sweater Tote Bag Gift

Here I am with another secret sister gift I have been working on, this time for a new secret sister. The gift theme this time around is to be “making something new from something old” or in other words to recycle something, but the catch is…something we haven’t done before! What a challenge that turned out to be to just find something I haven’t done before, since I have been crafting and recycling since I was old enough to read, beginning with a potholder loom and trying everything I could find.

Felting is something I have wanted to really try for a while. Last year I attempted to make slippers, the wool didn’t felt properly, so I “felt” it would be all right to try again and pray for success this time. My research to find an easy pattern with good instructions was found here, and I began with a sweater that was already partly shrunken.

One thing I realized about felting wool, is that one needs the agitator in a washing machine (top-loader) to do this quickly. Having a front-loading washer, I ended up doing the agitating by hand (my 5 year old daughter was delighted to help) in a sink of hot water…and had better success when rubbing the sweater against itself, especially the inside, which I needed to make as meshed together as possible.

Then it was a matter of drying it and cutting it out, which was easy. Stitching took a bit more time, I thought a “blanket stitch” would work well, but after having most of it stitched, my stitches looked too uneven, so I pulled all that out and used my sewing machine to turn the edges under.

I added a deep narrow pocket on the front for her cell phone or checkbook, and used an old Sizzix flower die on my Big Shot to cut out the flower trims, adorned with old buttons and carpet thread to detail them a bit. I threw a few flowers on the backside of the bag for good mearsure too. I saved the sleeves to maybe use on another pair of slippers for my little girl.
.
Remember when I said I started crafting with potholders? The rug used for a background under the felted bag in the photos, is one that I wove with loopers very similar to what I used way back then!
Hope she likes it!
Cheryl


Monday, October 12, 2009

Photo Collage Gift Project


This framed photo collage is a gift I made to give my Secret Sister at our revealing dinner this evening. The theme for the gift exchange is "For their Heart." My secret sis is all about her family, and so this is a project that I hope will touch her heart each time she sees it, if for no other reason is that she will see her family members.

Okay ---not one stamp image was used here, but it is mostly all made from odds and ends of various pattern papers I had around my stamp room.

I recycled a picture frame I bought cheap from a hotel that was changing the decor, so this was a rather large piece (for me) to paperscape, so not only a work of my heart, but also a frugal gift.

I went with colors that coordinated with the existing matting, and offset 12x12 pattern paper to fill in the backround. I finish the edges and gaps with paper strips, ribbon, and some metallic gold eyelash yarn. {I could not get a photo without the satin center ribbon showing alot of shine and color variation from my camera's flash, but I promise you, the entire thing blends and looks better in real life.} Then I hunted around for colors that would kind of bring up the not-so-noticeable colors from the background. After finding a few, I made my photo mats and frames using my Big Shot, some Sizzix frames and ovals and put together several photo mats and frames, and used the ones I liked best when I was done with that. (I saved the others for the next project...I have 3 more the same size frames to do, but because I am using scraps, they will all be different!)

Lastly, I added butterflies and gold bows around to glam it up a bit, and am leaving it the way it is, until I help my Secret Sister (who will learn my secret identy tonight) put her photgraphs in it, so we may add a few stamped images or phrases at that time, depending on what she chooses.

Hope she likes it!
C-ya Later!

Thursday, October 8, 2009

Merry Little Christmas Skaters

I am experimenting with various ideas for Christmas cards for this year's cards. I like to make many before I decide which is "the one" that will be our family card.

This card combines the "Winter Post" skaters and reindeer with the "Scenic Season" pines, and the greeting comes from the Level 2 Hostess Set "Christmas Punch."

Using Card Pattern's Sketch #35 as inspiration, I also used the Stampin' Addicts Color Challenge 32 with Soft Suede, Kraft, Old Olive, Real Red with Very Vanilla as my neutral color.

Tools that I used on this card include the Top Note Die with my Big Shot, the Wide oval punch and the 1-1/4" and 1-3/8" circle punches and colored pencils.

Have a great day!
C-ya later!
Cheryl

Hope I can remember how to post here!


Hello! I believe I am finally back to stick around. What a summer it has been! I am truly looking forward to a long white winter that will enable me to sip coffee, keep the home-fires burning, and do some serious creating. Summers are brief and busy around our home, more-so with our 5 year old, who sees each day as a chance to do as much as she can to pack the day full. They definately can give anyone a new perspective on the world we live in.
This is a WCMD challenge card I did last weekend, with the requirement to use "words" as the main focal image. It is a very simple design, but I fiddled with the frame to give it a textured look about it.
Begining with a 5.5" x 11" Ivory Naturas lcard base, I attached a piece of 5.5" x 5.5" pattern paper, and added brown ogandy with a tiny strip of Old Olive card stock over the top.
The sentiment stamp is from the retired Stampin' Up's "Sampler Sayings" and stamped it with Basic Brown onto Ivory Natural oval (coluzzled) that had the retired SU retired "Linen" background stamped with Creamy Caramel on it. This makes it look more stitched to me. i sponged the edges with Chocolate Chip and layered it onto an Old Olive oval (coluzzled again) and the Chocolate Chip frame was also Coluzzled on the inside and outside diameter as a frame.
To get the ouside frame's edging, I used an old pair of Stampin' Up!'s retired scissors (Antique Elegance, I think --- they were fabulous edgers!). Still lacking the "ooomph" I wanted, I then ran the frame through my Big Shot with the Finial Press Folder and was happy when I saw how it looked. Really a very simple card, once I figured out how I wanter to do it!
Enjoy your day!

Tuesday, July 7, 2009

Miss you a Latte!


As my first attempt to get back into regular daily stamping, I found a great "Clean & Simple" challenge at this site. After seeing the sketch challenge, I knew I needed to make a coffee card. For me, "coffee" is always the best place for me to start - for projects, road trips, mornings, even card making! This card went together quickly and I confess I do like how it turned out!
My card base is made from a cardstock I picked up several years ago, and while I cannot tell you the maker, I do remember it was called acurately "Gingerbread" if that helps anyone trying to replicate it. Real Red and Chocolate Chip trim for the Very Vanilla panel. I used Real Red Classic ink for the cup (What's Brewing?) and clear embossed over that with Faith's Miracle Embossing Powder, and added a light bordering blue for the steam swirls and some gingham ribbon. I used VersaMark with White embossing powder for the "Miss you a latte!" (Like it a Latte). The coffee bean pattern paper was a real find for me, as my love of coffee keeps me on the lookout for theme papers and stamps. This was a scrap from a GFS advertisement, and with careful trimming, I can make about 6 cards with the beany borders around the one page.
C-ya tomorrow!

A Drive by Posting

Seems like forever since I've posted anything. I've been busy lately, but truthfully, I've just been in a stamping rut and thought taking a break would do me some good. These are a set of 4.25" square cards I did a while back, that I came across while organizing my stamp room for the new Stampin' Up! year that is now under way. I believe I made them for a challenge, (or cased them, so if you recognize them, please let me know so I can give credit where it is due) but can't recall which one it may have been. All the cards were done with SU markers, direct to rubber.

Stem Silhouettes and Oval All Sets. Mellow Moss base with Very Vanilla panels and Always Artichoke and Perfect Plum layering and scraps of retired SU pattern paper. Scallop Scissors, MS Scalloped Punch, and SU large oval and scalloped oval punches.


Stamps: Stem Silhouettes, and random SU word (?) Sage Shadow Card Base. Very Vanilla Panels and Perfect Plum layers. Scraps of Retired SU pattern paper. Scallop Scissors, SU Eyelet Lace Punch, small, large and scalloped SU Oval Punches.


Stamps: Stem Silhouettes, Very Versatile. Pale Plum card base, Perfect Plum layers and Very Vanilla panels, and scraps of retired SU pattern paper. Scalloped scissors, MS scallop punch, and small and large oval punches, and a satin ribbon scrap.
C-ya soon!
Cheryl


Saturday, May 30, 2009

CPS117 Card Sketch Challenge


Hi there! I found a neat sketch challenge site called "Card Positioning Systems" that offers a place to start when card-making. I used Blush Blossom for the card base, textured with a Cuttlebug "Dotted" embossing folder template on my Big Shot. The flower image is from SU's retired set "Live your Dream" which I direct-to-marker colored with Really Rust, Bravo Burgundy, Chocolate Chip and Always Atrichoke (don't know why, but I want to always say Always Avocado instead). I layered the panel with the Artichoke, which I also used in the Scallop circle and stayed with the Rust for the dot, backed with a small rim of Mellow Moss, which was also the body for the butterfly which was stamped with rust. The butterfly is punched from a Martha Stewart punch, and the design was a detailed butterfly that I stamped on the Moss before I punched it out, to give it a few details. The birthday greet, stamped in white was from SU's currently available Crazy for Cupcakes. The colors are a bit odd for this time of year, but it's been pretty cool here and feels more like the chill of late fall right now, so that must be where my color scheme came from.
C-Ya Later!

Tuesday, May 5, 2009

Back to the Blog!

I can hardly believe it's been over a month since I last posted! Life has gotten very busy for my husband and I, as he is seriously working hard to accomplish the starting up of a business, and I will also be a part of that business as well. Add that footwork to his job (he is still working his full time job where 90% of the workers are laid off, so the remaining crew is jumping through hoops as they try to keep things going), our 4-yeal old (soon to be 5 years old) who thinks that Daddy hung the moon, and just normal daily living issues that happen every day, and "whoosh!" another month has flown by!
.
Anyway, I have done a few cards in this time, got some rugs finished, and will try to catch up somewhat in my posting of both this week.
.
Diva Coffee Break Designs had a sketch this week (#125) that got me rolling this afternoon. It was so easy, it would have been hard NOT to have an idea pop into my mind. I went with a monochromatic theme of Kraft, Chocolate Chip and Ivory, but relented and added the ribbon with a bit of red to zazz it up a little. If you don't have that Friendly Words Jumbo Wheel from Stampin' Up!, feel free to order one from me! It is so very nice of a background to use for easy cards. If you don't wish to order on-line, you may call me directly and I can order it for you! The birds used were from the retired SU! See with the Heart set.
.
More later!
C-ya soon!

Friday, April 3, 2009

New Goodies!

Does this little deer melt your heart? Another set from the new Occaissions Mini Catalog! Perfect for all the "deer ones" in your life...cards or scrapbooks...accompanied by a rabbit and owl and a tree! Too too cute!
.
This card I did for yet another challenge you can find out about here- CPS109. With an Old Olive card base, I added plaid pattern paper (sorry, it was a leftover scrap, I don't know who made it). The grosgrain ribbons were layered, because the orange had white stitches that clashed against the plaid. (ew!) Then, I hand-cut around the white circle with old SU scallopped scissors to make the Tempting Turquoise frame.
.
I know that a large portion of my cards are inspired by challenges. There are challenges for using certain colors, sketches or layouts, themes, techniques, limited supplies, folds, styles. Truth is, I have so much stuff to choose from that I could spend all day just looking for a starting point. So I check out the challenges and use the ones that can help me get started. I stamp with some friends that like to use stamping catalogs or magazines to case from, and we have found we get alot more done by having certain perameters set for us. I'd be interested in knowing, where do you get your "starting points" from?

C-Ya Later!
Cheryl

New Goodies!

I got in my Stampin' Up! pre-order for the new Occaissions Mini Catalog - and looky here what they came up with to go with out 2 beloved Small & Large Oval Punches!!! There is now a Scallop Oval that fits the Large Oval perfectly! To make matters even better yet, there is a set of 4 stamps, called "Oval All" to give you something extra to use with it, other than all the little words and phrases we've been using all along. I really like the new Mini Catalog offerings!
.
Using my markers directly on the rubber images, I played, colored and punched and made a whole bunch of labels ready to pop onto a card as needed. These are really quick and fun to do! Then I made the card above choosing to use a label I particularly liked.
.
The card is for a fairly new weekly "Clean and Simple" challenge on Splitcoast. (CAS08) An 8.5" x 4.25" piece of Sahara Sand folded into a square card, with a strip of Perfect Plum along the bottom, I added matching ribbon across the seam and popped the label on top. Easy & super quick!
.
C-Ya later!
Cheryl

Rodeo Clown Cowboy

This is a card I did for the mini vsn (virtual stamp night on Splitcoast) last weekend. I had it done in time, but didn't get it posted as an entry. The challenge was to use a circus theme - and not having clowns in my vast array of stamps (as I am not fond of clowns for the most part), I wondered if I could give the Cowboy Kid a new costume...so here he is, did you recognize him?

C-Ya later!
Cheryl

Thursday, April 2, 2009

Best Kind of People


This card is one I made using a direct-to- rubber technique to color the image. Not having the in-color blue marker that I needed on the leaves (because SU doesn't offer them), I improvised by using a blender pen on the ink pad (oops! guess I didn't order the refill when I ordered the pad). As you can see, it worked pretty well. The upper pattern paper is the brand new "Walk in the Park" Collection by Stampin' Up! The lower pattern is the jumbo wheel "Friendly Words" inked with white and rolled on Basic Gray card stock. The sentiment is from the set "Soft Summer" offered in the current Mini Catalog, which has a great selection of new goodies. You can see the on-line copy at www.stampinup.com
.
Then, you can order on-line (please list me as your demonstrator), book a workshop with me, or call me and I'll do it for you. Easy as that!
.
I've been away a while to catching up on things, moving some things and preparing for the coming spring and summer....stamping when I could, but sometimes, just needing to take a break and do something different! At least, that was my "forced-to-make-a plan" plan after having my computer screen post a message on my screen saying "hard drive failure is imminent, save files now!" Fortunately, ALL of my stuff was saved, but I had to wait until a new one was ordered, arrived and was re-installed. (I thank my dear husband, without whose computer knowlege I would have been doomed back to the dark ages for the rest of my life!) This only took about a week or so, but I then had to finish up at least some of what I had started.

.
One of the major things I did, was clear out (read: made space to move around in) my 'Loom Room' and started making carpets again. #5 is on the loom now, so when I take them off the loom, (several rugs are woven before taken off the loom) I will share some photos of my rugs here. Generally, all my carpets are made from recycled garments or re-claimed materials. I wove quite alot up until the time I started stamping...while recouperating from knee surgery, and got away from it for the last several years.

I'll be posting more as I can - I really did do quite a bit of stamping in this interim too.

C-ya soon!
Cheryl

Thursday, March 12, 2009

Cards are a gift of "Thyme!"


Tomorrow evening, my husband, Mark, will be attending a Men's Retreat at the church he helped to build last fall. (Anyone remember the 350 cards I cranked out for the building help?) This time there wasn't as large a project, but I volunteered to make a set of cards for the baksets of 2 of the pastors that will be there.
.
Our church is famous for baskets, I think, because anytime something is going on, there are gift baskets to be put together. They are always very nice and thoughtful, but try as I might, I just don't have the knack for putting all that stuff together and making it look all foo-foo and nice and all...but I have found that I can make cardsto help fill them up and I am helping out the best way I know how to. But this is the first time I have made cards for the guys' retreat.
.
So I picked out some masculine paper and it matched the former in-color "True Thyme," of which I am in very short supply of. So I stamped and I sponged and used the smallest pieces up, trying to conserve all I could, because once the in-colors are gone, they are gone! I did not stamp the insides, as I wouldn't know what would need to be said at the time they wanted to use the cards. I will also stamp an all-occaission verse on the envelopes, so they won't have to (if they even noticed) a certain card to a certain envelope.
.
Here are the individual shots below, with a quick name of the set I used, so 3 are pretty vintage for Stampin' Up! sets, which I am thankful that I got them way back when.


This card is from the current SU set called "Winds of Grace."

This image came from SU's retired "Beauty of Life."

This eagle is from the Retired SU's "Birds."

This is the card from SU's Retired set, "Set Sail."

Monday, March 9, 2009

Bitty Bunny Purse

This Bitty Bunny Purse is the Technique Lover's Challenge (TLC211) today ar SCS. It is so fast and easy to do that I plan to make several more for my daughter's girlfriends. The first time I saw these was on the 'Paper Pleasing Ideas' blog and I wanted to try them then, but didn't...so today when I went to check out the challenge for today, there it was again with a diect link to Julie's tutorial - so I did it up quick and just love how my little project turned out!
.
I used Certainly Celery card stock and the matching Designer paper that came in the 6 color stacks of 6"x6" paper. The stamp was from a vintage Stampin' Up! set called 'Spring Things' that came out in 1991. I punched the rabbit image out with a McGill scallop Punch, and colored the bunny details with my Prisma Pencils. I added the little curls around the outside edge of the square with the celery colored pencil, and if you click on the picture above, you will see that I went around the whole shape of the bunny with a very light gray,which almost seems to lift it up from the paper. Stampin' Up!'s new Eyelet Lace Punch trimmed the top and inside pocket of the purse. One last detail that I changed was using 3/8" white grosgrain instead of the handles as paper just wouldn't hold up against my 4 year old little girl!

Inside the purse, I stuck 3 small bottles of Bath & Body Works Hand Gel to show size only. I would strongly advise against ever giving these to any small child as they are primarily alcohol based, and could (and have actually) caused alcohol poisoning resulting in injury or death in children that were tempted to taste those pretty smells. These hand-wash gels are great to use when you need clean hands, but you should always watch and make sure that children rub their hands until totally dry so they do not try this. {In case you didn't realize this, it is good information to know!}

C-ya later!

Saturday, March 7, 2009

Cupcakes Anyone???

I love this set! I've had it for months now and I hate to admit it, today is the first time I have ever used it! I decided to participate in a Sketch Challenge by CPS (Card Positionin System) and having chosen the colors I did, the cupcakes were just begging to be used.
.
Starting with a Pirhouette Pink card base, I then chose my new Pattern Paper, SU's Sweet Always. I picked the paper and then chose Pumpkin Pie to do my framing with. I used Fiskars "postage stamp" decorative scissors to trim around the tiles, and pink ric-rac over pumpkin paper for a ribbon effect. I used my Prisma colored pencils to color the popped-up image...no fancy techniques with the pencils, but I do love how even the coverage is when I am done. Someone gave me a cheat sheet that matches the SU colors to the Prismas, and that really helps me keep it close. Wanna Cupcake?

C-ya later!

Friday, March 6, 2009

Sweet Stem Flowers "Friends" Card

I tried this Weekend Sketch Challenge for the first time with this card. Upon seeing the challenge, I reached for a scrapbook set of papers I had bought at a book sale (actually I bought 2 sets). Finding this flowery warm-colored flower print, I wondered if I had any stamps to match? Honestly, I have so many flower stamps that I would have been astounded if I didn't, but "Could I find one to match?" was really the question of the hour!
.
My first thought was Doodle This or That...but then I saw my new Sweet Stems set, and by golly, they were the right sizes and pretty close of a match. I stamped in Stazon Black and colored them with my prisma pencils. Having used Office Max Cream for my stamped paper, because it so closely matched the pattern paper, it looked pretty pale against the print...so I found a "brownier" tan and scribbled the backgrounds behind the flowers until it got pretty close to what I wanted. I scalloped the Bravo Burgundy piece and the holes "disappeared" on the print, so I repunched with the cream and attached that piece behind the burgundy and oriented the holes directly above the burgundy holes so it would 'light up' the lace. After trying to fill up the space to the left of the image with a variety of ideas, I just added a little of some punched green last to the edge. Still, I needed something else...so I took the "friends" label off a card I had recieved from a friend, and it worked so that I can pass it on to another friend. I guess that's what "friends" are for!

Have a good weekend!
C-ya later!

Thursday, March 5, 2009

Why, Thank You!

Stampin' Up! has offered a selection of single stamps in our last catalog, and to be able to show it, one must buy it to demo it...so this is the one I chose. Yesterday while filling orders that had come in (yes, I pack the bags for the hostesses), and I usually try to remember to stamp a Thank You on the invoices...so I grabbed this one...the one featured in the framed diamond.
When it came time to stamp the hostess's order form, I wanted to stamp it 3 times, and it happened to turn out in a pattern...hmmm...wonder if I could do something with that idea?
.
So last night, I pulled out my Stamp-a-ma-jig and did the background in about 10 minutes. I thought I could use this idea for SCS Limited Supply challenge (LSC209) to make a background paper out of one set, and comeplete the card with only stamps from that set...so, having used a single stamp to do the background, I also needed to use it for the greeting. I used Pacific Point ink on Certainly Celery, but the better match for the quarter sheet behind the card was actually Not Quite Navy. Grosgrain ribbon and Nesabilities squares to highlight the single image.
.
If you haven't gone past the index in the Stampin' Up!'s Spring & Summer Idea Book & Catalog, you should! Not only is the Ronald McDonald House Charities set there, but you will find several single images as well as two very affordable starter Mini Note kits, perfect gifts for the new stampers who are curious, or maybe someone you would like to help become a stampin' buddy!

C-ya later!

Sheetloads of Birthday Cards

For as forgetful as I am. birthday cards are always seem to be in short supply, especially when I need them in a hurry, so I thought I would get a little pile of them ready for last minute well wishes. This layout was from the February Sheetloads sketch found here
.
"Sheetloads" is a great little site that actualy has a sketch layout each month. You can download a free little magazine that gives you the sketch and all the measurement for each card part...for just a single card, or a whole batch! They even chart it out so you know exactly how to cut each page up to get the most from your paper stash. The rest is up to you! You decide what colors, papers, occaission and adornments you want. It's a great way to stretch your creativity...and of course you can change the dimensions to suit your own images or purposes, the main idea is to get those cards made! You can also post your projects there too, and sometimes they even have prizes...

As you can know, it is now March...but nevertheless, they are finished, 6 of them! (that is good for me) and now I can allow myself to go and look at March's issue. Go take a look!

C-Ya!

Friday, February 27, 2009

Bluebird Blessings Card

I have been re-organizing all my little S&Fs into a pocket hanger, and I found this little piece of glossy cardstock with Polished Stone technique, so I thought I would see how glossy cardstock goes through my BigShot with a sizzlit. (wonderfully) You like?
.
I used the Marvy Mega and Giga Scalloped Oval Punches, CB Fine Vine folder, the SU Scallop Border Punch and the Graceful Words retired set from SU. One more note: I had to put scotch tape under the folded wing as a reinforcement because the glossy cardstock tended to crack and I didn't want to to break off, and the tape actually will help the wing pop up when it comes out of the envelope again.
.
Not having looked at other bird die-cut cards until after this one was finished, I now see that most people turn the wings to flap to the back, and not up and down...so this is a rare bird!
.
C-ya later!

"A Little Note" from my Secret Stamper!

I got this card the other day from my Michigan Mingle Secret Stamper and it is an adorable card! I love the colors and the images, and the more I looked at it the more I liked it. Something I have never tried (or thought of even) is to "cross the sacred boundary" of layering over the edges of the front quarter-sheet panel onto the card back (see the yellow flower panel positioned over the white edges of the card base?) It is perfect to draw the eye upward to the corner to where the butterflies are flying. Makes me happy to look at it! I love this card and thank you Secret Stamper for a wonderful box of goodies too!

Saturday, February 21, 2009

"Polka Dot Punches" Flower Card

Hello! Today I have a card that I made starting with a sketch that lost all meaning as I went along, and using punches to do alot of the work for me. "Polka Dot Punches" is one of the 6 selections offered for free with $50 orders made in Stampin' Up!'s annual Sell-a-Bration held in February and March.
.
Learning from a tutorial I found here using the Five Petal flower punch, and the matching stamp from the Polka Dot Punches set, I followed the tutorial and put the flower together. I made my leaves from punching the Large and Small Oval punches, folding them in half and then running them through my crimper. (Yes, I did end up snipping the round tips of leaves to make them pointed, but it was a good starting point.) I also used a crystal brad (from the Pretties Kit) for the center of the flower. The bottom strip of designer paper is from the Raspberry Tart collection with the Scalloped Border Punch on the bottom edge. The sentiment actualy came from another Sell-a-Bration set called Botanical Blooms, using the Large and Small Oval Punches for the framed effect.

Have a great weekend
and I'll c-ya later!


Monday, February 16, 2009

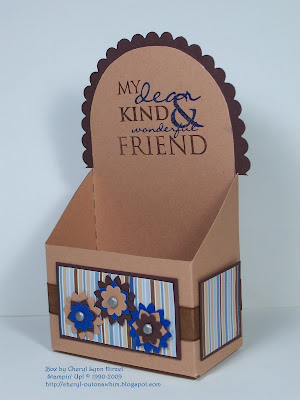
Round Topped Box Project

Good Morning!


I went to Splitcoast Stampers this morning and found the Technique Lover's Challenge for today was the template for this cute little box. I printed out the template on Creamy Carmel card stock, cut it out, decorated it with rest of the scraps leftover from an 8 card set of 3x3s that I made on Friday...to use some scraps! I love this little box - it was quick and easy and although I made it to fit the cards, it would work well to put a few cookies in it, make it into a "get well" package of a instant cup of chicken noodle soup, tissues and cough drops or Tylenol, or a little giftie trinket nesting in some paper shreds.
These are the 3x3 cards that I made last Friday (inspired by CarolineInToronto's cards), I used Stampin' Up!'s "Puns from the Past" and found the set to be very versatile and easy to spin out more ideas as I used them. The images work very well with a wide variety of SU's punches. This set was a gift to me from my good friend Theresa, and you can expect to see more of this set, as it is already a favorite of mine.
.
That's it for now!
C-ya later,
Cheryl


Wednesday, February 11, 2009

Trio of Cards from my Secret Stamper

This entry is featuring 3 cards I have gotten from my Secret Stamper in Michigan Mingle Group. I do not know who she is, so I can not give her the credit she deserves! (YET!) But, please leave comments for her on this entry, because I believe she did a fabulous job on all of them!
.
How I LOVE my coffee! Anyone who knows me knows that I practically live with a mug in my hand, from morning til bed-time. (Caffeine has never bothered me - unless I was pregnant, which then was doctored with milk and sugar to accomodate my changing cravings, LOL).
.
But I have a full cup cupboard for my ever changing fancies durring the day about which cup I feel like sipping out of...and this would be one I would grab for a morning-blend coffee. Great card and colors!


This pocket card sporting Spring colors (and I long for spring to get here!) has an adorable window filled with springy flowers, and the ribbon pull tag lifts the card from the pocket

See when it is lifted? Really very sweet!
Have you heard of the Michigan Mingle being held in Bay City Michigan? There's only a little more time to sign up, but you can read about it on http://www.splitcoaststampers.com/ under the forum label "Get it Together" on the spot called Michigan Mingle. For anyone who wants to attend, act quickly and let me know if you want to carpool - I'm driving from Baraga.


I think that this card is called a "squash card." Made from a 12x12" piece of beautiful cardstock (and I would love to know who makes such a heavy double-sided paper as this!). My Secret Stamper used the patterns on both sides to make a large 6x6 card with a unique fold and fun to open note inside. I am thinking I found the correct ribbon to put back through the holes in the bottom. My 4 year old daughter likes to "find" (read: "filch") things for her little stamping cubby, and this looked like a recent "finding" when I found it there! She has great taste!
Remember - please leave some comments for Secret Stamper's awesome cards.
C-ya Later Today!


Thursday, February 5, 2009

NO stamps here!


Here is a card I made today for a challenge and when I had finished and started noting what I had used in the process, I realized I had not used a single stamp!
.
Another 6x6" card - I seem to be on a roll here, and using K&Co Paper from the Blue Awning Pad. I guess the nice thing about using 12 x 12 paper is that I get 4 card fronts from each sheet.
.
Today's SCS "Ways to Use it" Challenge was to use a pile of embellishments...and so I started with a monogram chipboard letter that came white with a glitter pattern all over it, so I sponged a deep blue over it to get the white out of it. (warning: you will probably get glitter all over your pad! LOL). Next I used Brocade Blue and Night of Navy to die-cut my Nesties Scallop and Plain Ovals, at which time I had one of those AHA! moments.
.
***When cutting Nesties, I've been layering the top over a bottom piece. But today, I realized that if I were to die cut a frame for the back layer of my Nesties, I would also have a pre-cut smaller oval for another card...and there are times, when I am making my "sheetloads of cards," that I could end up with a stack of pre-cuts all ready for a future batch of cards! This can save me time and card stock and no one will ever even know the difference!***
.
The flowers were some I had here (odd-looking to have green in the centers, but I think they sorta go with the green on the Pattern Paper). After removing the plastic centers, I secured the blooms with rhinestone brads, and stuck a few "diamonds" over the navy organdy ribbon that runs under the oval. I
.
The last part to go on was a brass hummingbird. I liked the idea, but not the brass, so I grabbed my Gold & Silver Painty Pen and painted over the brass with the silver part of the pen and it dried quickly and I stuck it on...and done.
.
Have a great day and stay warm if you aren't already in the tropics!
Cheryl

Tuesday, February 3, 2009

Recessed Frame Challenge Card


This is the card I posted last night for SCS Techique Lover's Challenge to make a Recessed Frame Card. I could see what the directions were saying to instruct us to do, but tinkered with it and wasn't satisfied with how mine turned out. I then found a way to make it an easier task. If I had know it would have worked so well, I would have taken pictures along the way to show you - and as it seemed many had trouble, I am going to try to do another one and take pictures to post another attempt at a tutorial.
.
For this card, I used an image I did a while back from my "S&F box" that used the Heartfelt Thanks bachelor buttons stamped 3 times with the White Craft Pad and dusted with the Chalk Pastels. The edge was Faux Stitched and measured 4.25x2.5 inches. The designer paper (K&Co.) base I used is 6x6 inches. I also used a piece of HodgePodge brass for the "love you" frame, and a touch of ribbon. Getting that far, I decided to put my Martha Stewart Punch to use and make a lace border al the way around the card. I cut the lace edges straight off and filled in the gap with a 1/2" circle of matching paper to fill in the corners. I put a 6x6 (12x6 folded) base on the back and it works quite well to stand up on its own.. which was what I had hoped it would do, as it will be sent to my dear sister-in-law as an encouragement to her.
.
Please check back here later today for the tutorial! I just had my "vision" for what I am doing with my next card.
.
C-ya Later!
Cheryl

Saturday, January 31, 2009

January Sheetload of Cards

I love doing challenges from this website called "Sheetloads of Cards"

Although I looked and studied the sketch early this month, I have just now finally made my cards and posted one. The sketch comes with photos of cards using this sketch, plus the cutting plans to cut each compnent the right size to do only one of or a set of eight...it's all right there and it's free...and you might even win something! What a great way to use up all those "extra" papers!
.
This card is very bright and cherry. I used Stampin' Up!'s "Pun Fun" for my images (I did 8 cards, using one stamp of everything but the jet and 2 latte cards. I used Green Galore and Pink Pirhouette for the solids, choosing them after I had decided which patterns I wanted to combine. Then I chose the stamps according to the size panel alotted for the card...although I could have chosen the image first and then cut my panels to fit; they give you the sketch as a pattern but we CAN take the scenic route if we want to! It's all about "artistic license!"
.
The ribbon I had...and the flowers were an afterthought as the sketch indicated a little something in that area. The coloring on the images was done with Prisma Pencils. I picked this set up almost a year ago, and have been dabbling with them here and there, I knew about Gamsol technique, but other than a dab here and a dab there I couldn't see what it would do.
.
But after coloring on the paper, I tried a timid interpretation of Gamsol with Oderless Mineral Spirits (what is used for the gamsel technique) to smooth out the pencil marks and it worked great! I don't have all the technicalities of this coloring style - but you will be hearing more about this from me. Okay, I'm turning in!
.
Goodnight!

Wednesday, January 28, 2009

Retirement Card

Last week I was asked to come up with invitations to my Pastor's Retirement Party. While he is not retiring from the ministry or pastorship, (which I thank God for that!) he is retiring from his secular job with the local power company after over 20 years of faithful service there. Being in a small community, it was common to see him driving around the area in the company truck, which I have tried to depict using Stampin' Up!'s "Loads of Love" truck.
.
I began by printing out the wording for the invitation on full sized card stock and cutting that cardstock down to 8x5.25". Then I scored at 4" and creased the cards well to stay flat while I was stamping the truck image with Black Stazon. My dear husband was kind enough to do the detail striping down the sides of the truck...the first of his contributions on this project. Next, I cut a clear plastic mask that covered the truck while I tried brayering. The mask worked well and will remain in the set case for ever more, but the sky was "liney and then I remembered I had a sponge brayer I had never tried, and suddenly, the sky brightened! :)
.
Once again I cut another clear plastic image to sponge the grass...and added stamped tufts of grass for texture. Again, I stamped the truck on a clear template and cut out the tires, and sponged them with Basic Grey. (Are you tired of working on these yet? Uh-huh!) At this point, we gave the truck chrome (silver on the Painty-Pen) hub caps, fenders and headlights. Oh yes and Red Gel pen on the tail lights. The door decal had to be traced around a very small oval, and printed UPPCO (Upper Peninsula Power Company) and then hand cut out that oval and glued on.
.
Then came the trick of sponging on the dirt road holding a masking piece over the sky and the and a masking piece over the grass, and another over the truck. Also to be done was the stamp out the "celebrates" and cut them by hand (of course!) and glue them onto the the back of the truck...and hey! what are these little spots on the sky???? Okay, we'll stamp some smiley faces on the snow blossom punch and call it a sun...stick them on the spots, and add them where it looks good if there isn't any spots...oh yeah, and then glue all the green quarter sheets tot he cards! Is that all? Now, how many do we have to do???
.
What started out to be a simple invitation, turned into a regular marathon to get nearly 60 of these done before my family left Friday morning on a 5 day trip to help out my husband's brother and sister-in-law make the adjustment from hospital to home after my sister-in-law had a stroke as a result of brain surgery, 2 days before Thanksgiving.
.
She, Nancy, is doing amazingly well, and although she has alot of PT and work to do, she's a fighter and will do well. God has been very merciful to Nancy, and she has more ability, in spite of the severity of her stroke that even the doctors had hopes for, and a patient husband that would die trying to help her the best he can. I cooked up a bunch of meals ahead and went grocery shopping with my brother-in-law to help him figure out how to work in this area of the house-chores. My husband helped with hand-rails and other aids to help mobility within their home. She needs to do "laps" around the staircase (rooms go around in a way that you can go in a circle) Steve is going to encourage/bribe her with lattes. No, things will not likely ever be the same as they were, but life is still good and God is awesome!

C-ya later!

Saturday, January 24, 2009

Snap to It!

Good Saturday Morning! I have been very busy this last week and although I am away from home, I thought I would try to add a card to my blog, once I remembered I had the photo of it in my e-mail. This is the 3rd card from my January Card Camp, featuring Stampin' Up!'s now retired "Crab and Company" set. We colored the images with Prisma Colored pencils and used nestabilities for the oval and the scallop as well as glossy cardstock in the "swirls" cuttlebug template in my much-loved & used Big Shot. We sponged Tempting Turquoise on the glossy texture and trimmed around some of the swirls to give the effect of waves. The beach is cut from sandpaper and laid under the waves, and the card base is again Tempting Turquoise. I must add that I have no idea how bad sandpaper would be on your paper scissors, and I used an old pair of "old schoolteacher's"scissors (no insult to any teachers here -they just remind me of the ones my grade schoold teachers had - big long metal scissors with painted black handles that look like they came out of the basket from the Wizard of Oz witch) I know - weird associations going on here, because I loved all my grade school teachers --- must have been the long road trip yesterday!
.
C-ya later!
Cheryl


Monday, January 19, 2009

NEW!!! Echoes of Kindness


I thought of this set as soon as I read the Technique Lovers Challenge on Splitcoast today...a technique that I used to do alot, several years ago...so I hopped right back to that technique and it's alot easier than it looks. Hence, here's a tutorial with my hints along the way.
.
First you want to raid your scrap pile. If you want to make tile, cut them on a cutter, use a punch, freehand cut (like I did) or tear. Such a great way to use up ALL your scraps!
.
***I use 2 sided carpet tape, that I use a great deal of, when I am card-making. Unless you're very lucky, you cannot usually remove a piece once you tape it. It's about an inch and a half wide, and you first stick it on your piece to glue on, and then peel the remaining backing off. It is a dollar at a dollar store for 47 feet, and if you can't find an easy method to peel the backing off, grab your Tupperware orange peeler and it'll flip it up for you. I would not recommend this wonder-tape for scrapbooking, as I am not sure of it's acidity.***
.
Stretch out a piece about 6 inches long to a lightweight sheet of paper. I used one width, but if you want wider, lay the tape lengths out, side by side with no gaps, so that you can peel up the tops without messing up the adjoining edges when you peel them.
.
Peel the top/tops off.
.
Put your little pieces all over the tape, leaving spaces between for the embosing powder to stick to (like the cement between bricks).
.
**Here is where I invented tools to help pick up those itty bitty pieces. Use your 2-Way glue on the end of a crochet hook, stylus or a pencil-end eraser. Let it dry for a few minutes and then you can pick up pieces and put them where you want them on the sticky stuff. So easy now!**
.
Fill in your area and then cover the in-between spaces with your embossing powder. Heat. Check after it has cooled for any spots you may have missed and re-heat those areas. It is easy to do, since you have so many edges to keep track of. Now cut down the mosaic to size and use on your card.
.
Let me know if you tried this!
.
On my card I used Pale Plum, Perfect Plum, Brocade Blue, Soft Sky, Almost Ametyst, and Not Quite Navy, White cardstock. Copper embossing powder. A touch of Pearl-Ex (over the tiles) and a the "Alligator" Cuttlebug embossing folder, and Nestabilities Ovals and Scallops, Watercolor Crayons.

Paper Roses Tole Card

First of all, please click on the photo for a close up of the roses, so you know why I am so anxious to share these with you! I found this great "sneak-preview" tutorial last week which explained how to make these roses with a brand new 'deckle cut" rectangle set of Nestablilities, to be released later this month. So I, not having a set to try this out immediately after seeing it, grabbed my old-fashioned deckle scissors and cut my own out to see how it would work. I was way-less than enthused by the time I was finished shaping it...but when it dried, it seemed like it came to life!...hard to explain it, so you have to try it and let me know. (No deckles? then tear your paper!) I alternated Bravo Burgandy and some old Baroque Burgandy rectangles (slightly elongated squares), and staggered the corners when I laid them together and glued with Fabri-tac. You wouldn't have to stick with the deep reds. I actually think So Saffron and More Mustard word work well too - and they are just scrap sizes so go crazy! The other weird thng about these roses, is that after getting paper wet and letting it dry after you've done your shaping, the roses become very stiff like cardboard! If you try this, link back and I'd love to see how yours turned out!

Saturday, January 17, 2009

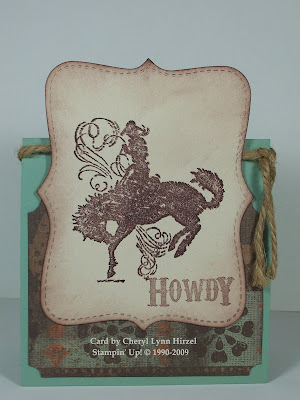
Howdy Cowboy


Howdy Strangers! I'm back to posting again after a few weeks of getting into the New Year routines...my DH was on vacation over the holidays and although he got a few things done around here, we mostly stayed around the homefires and sipped hot coffee. But it sure seemed I had lots to catch up on around here when he went back to work!...and this long stretch of a cold spell here in the UP has just about put me into hibernation! Maybe I'm getting old but it seems I can't warm up and stay warm like I used to. I've taken to wearing knee-high leather slippers and a knitted red shawl over my shoulders (when I'm not donning a bathrobe I use to help stay warm). Enough about the weather now, I know spring is c-c-c-c-c-oming...just seems alot further away than it did last year about this time. BRRRR!!!

This is a topper-card I did this week for my card camp. Featuring some of retiring sets, I had to have this set included in the class. Using the Top-Note BigShot die, I cut-out, stamped and sponged it to distress it, tied on the rope and set it over a piece of western pattern paper with clipped corners. ***The folded card base is 4 1/4" square, and I always do this style of card laying the base on an A-2 envelope, aligning the bottom edges of the card and envelope's side together. You will see where to attach the topper and still be able to fit it into the envelope, rather than make the card too long.***

That's it for tonight, I've got more cards to post tomorrow!

.

C-ya later!

Cheryl