Wednesday, July 30, 2008

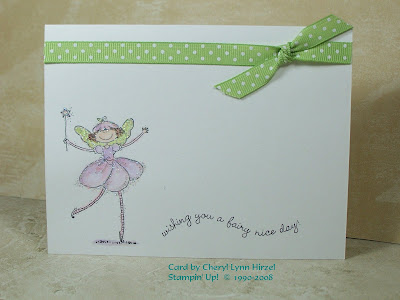
Fairy Nice Card


My how time has flew by since my last post! That's how summers seem to go around here - FAST!!! I did this card over a week ago and am just getting to post it now. It was a SCS Challenge that challenged us to make out card using an all white card base, no layers, I think, although that may have been only my interpretation of it. The idea being to enjoy the white space and not clutter it up with so much stuff. (I could take some life lessons on this! LOL)
So, I dug out a set, Stampin' Up!'s retired Fairy Nice set, and stamped the image and words in Stazon Black. I watercolor-crayon painted the image and outlined it with a glue pen for a thin outline of the image. Next I sprinkled Dazzling Diamonds over the glue, and dug through my ribbon drawer until I found a ribbon that matched part of her dress and put on a ribbon across the top. I like the look more than I thought I would...definately I need to try some more of these cards with 'white-open spaces!'
Have a Fairy Nice Day!
Cheryl

Tuesday, July 22, 2008

Stamp Camp Card Kits Available

Today I am adding a link to my page to let you see what cards have been done at my card camps, and they will be available to see and purchase per the information on that page. My July Camp cards are at the earliest entry on that blog, and then as an afterthought, I added cards that were held a camps some time ago that are still available for purchase. (Please write or call me if you have any questions - I accept Paypal or Money Orders.) No time limits, just go back to whatever you see, and let me know what you need. :)

You can go here to see the Stamp Camp Card Kits

Thursday, July 17, 2008

Cinnamon Moose


Here is today's "Ways to Use it Challenge" which required us to use something out of the spice cupboard to make a card. I instantly thought of Cinnamon, as I had played around with this some years ago...but last night I didn't have the greatest results with several attempts at adhering it so it wouldn't brush off easily. I did end up using a glue pen around the the outside of the moose and it left a great smelling card to boot. I had no plan for the card, beyond getting the moose done, and I was working without a sketch. The moose being finished, I punched it out with the biggest circle punch I had. Then I had to coluzzle a larger circle of Not Quite Navy to background the vanilla circle. For some reason, the idea of off-setting the circles appealed to me for this card, so I went with that idea. The Olive card base was stamped the Canvas Background with Garden Green on the lower front of the card. I used a scenery set from TAC to put a few trees behind the circles. Now the circles (too plain) need something else too. Eyelets? Yes, they'll work. Mark the spots and put them in with the Crop-a-Dile...that tool is the perfect way to get the job done quickly and quietly so I don't wake up Natalie, my sleeping 4 year old in the next room. Next, a Pumpkin Pie belt to divide the 2 images on the base. Now it looks way too flat! So I crimped the belt and popped up the moose...and it's done! Hooray!
Have a great day!

Yooper's Quincy Mine Landmark Card


This (SC185) sketch called for the right shape to use a new stamp from a set that features some major landmarks for the Copper Country, in Michigan's Upper Peninsula where I grew up and live.
This is the Quincy Mine in Hancock, MI. It is also this copper mine that my grandfather first worked in 1925, when he was 15 years old, before moving to the Chicago area a few years later. Mining is a huge part of history in the UP. My great-grandfather also (other side of my family) worked in the iron Mines over in Ishpeming while he moved his wife and children over from Finland, sometime before 1910 when my Grandma was born here in the USA. My dad also worked briefly in the iron mines when my parents were first married.
Although in recent years the Quincy Mine building has been re-sided with new gray siding, and is open for tours, I chose 'rust' to color it, for in my childhood there are vivid memories of a very rusty building that resembled (in my mind) a huge robot shaped like a kangaroo that might move if I didn't keep my eyes on it. A nostalgic moment here...gee, what a strange imagination I had! LOL Have a great day!

Scripture Encouragement Card Set


Hello,
This is a set of Scripture Encouragement Cards I whipped up the other night after looking at card sketches in a catalog. To look at the cards individually, you can just click on the phots and it will enlarge for a close-up.
What exactly is a 'Card Sketch?' It could be looked at as a 'map' of where you are going to place your images on a specific arrangement of paper or layers. You use whatever images, colors, patterns, ribbons and or embellishments that the sketch inspires you to use. Everything will be variations on a theme and that is a great starting point for me...As you have probably noticed, many of the cards I do are inspired by sketches, or challenges (which I will cover on the next post :)
C-ya then!

Monday, July 14, 2008

Grid Card Challenge Card

Hello,
This morning's Technique Lover's Cahllenge was to make a grid card using a scoring tool. As I have used both the score blade from the Fiskars Personal cutter, and more recently acquired the Scor-Pal from my husband, I used the latter tool for my card this morning...and did it ever work wonderfully easy!
Here's how I did the my card. I began by looking at this Grid Tutorial and then grabbed a piece of Kraft Paper to try it out. Well, it turned out well, so I just decided to use that scrap for my project. I chose Real Red for the card itself. Next, I determined that my grid needed to be a window frame, so I used a large square punch and punch it from all four sides to make a larger square...I'll do a tutorial later this week how I do this. I planned to do a single inking of red on my Canvas Background stamp and for some reason, it cme out weird, so I huffed the stamp and put the paper on again, then again, and kept trying to get an even look to it. Not to be done, but it did come out with a kind of "shabby chic" look about it (read: LAZY), but I was satisfied, so Iwent on to stamp the Queen Anne's lace silouette from Garden Silhouette...and then dotted the tips with my White Signo Gel Pen. I would have liked to do something white on it (words or something) but my white Craft Pad is missing in action somewhere, so I settled for the white dots. Then I tied a very ravel-lish ribbon aound the frame, like a gift ribbon. This is a very fun technique...and I'll probably be looking what else I can do with this tool I have not used to full potential yet.

So there you have it! Have a very good day!

Cheryl

Saturday, July 12, 2008

Hi Again!

So after doing the pink card, I began to think of other options...Stampin' Up!'s soon-to be-retired 'Simply Said' came to mind as this soon as I saw this scrap of pattern paper. It took a little cutting for the daisy itself, then I used my paper crimper to try a different style of leaves, and used a big thick Dimensional Glue dot for the center and pressed Dazzling Diamond Glitter to give it the glimmer and take away the stickiness. These cards were quick, simple, and easy, and I like how they both came out.

Talk to you later!
Cheryl
Hello again!

I haven't been around alot this week - summers are short and very busy around here - but I did manage to get some stamping time in. This card was totally inspired by Julie's Paper Pleasing Ideas Blog (This is my all time favorite blog to read). She is one very talented woman and the idea came not only with her 'Flipped Sketch' pattern, but with a tutorial that show exactly how to make torn paper roses. On this card, I used pattern paper and a ornate corner punch on the white background - other than that, it's pretty much CASED. I love this style, and hope to come up with some masculine ideas (probably not with roses) and see what I came up with.

You can check Julie's blog and how-to's by clicking *here* so go have some fun!

On to the next post, as I don't know how to do 2 photos on one post yet!

Cheryl

Wednesday, July 2, 2008

French Swans on the Lake


I loved making this card, once I decided on the image and background paper. That's alway the hardest part of getting started. Although I have a LOT of stamps and cardstock, sometimes it is a hinderance to getting started. The image, I decided would have to be based on the size I needed for the measurements given. In the way back of a drawer I found a set (SU's Birds, ret.) that had NEVER been used! So I stamped it with Going Gray and Watercolor Crayon painted it with Celery and Bordering Blue, and Pumpkin on the beaks. Then, I found one pattern paper I really waned to use, and nothing else in the K&Co Bailey collection matched. So, I found a muted celery-ish pattern there and stamped French Script over it with a Blue Bayou, to tie it to the piece I loved...on the right. I bordered the pieces with Going Gray and used Soft Sky as my card color...then I wondered if there was a way to pull our the swans a little more.


I took some PolyMark Bright White Dimensional Paint and put a few new beads of it on the necks and wings. Well, that looked weird, so I picked up my paper piercer and started trying to move it around and smooth it out. That wasn't working either, but by this time the white goo was beginning to dry a little and it made it thick enough to leave the textureof little comb marks where the feathers are. It did do to it what I was hoping to do.

We see swans from time to time in Lake Superior, such a spledid graceful sight.

Have a great Day!

Cheryl

Tuesday, July 1, 2008

July Already!

Can you believe it's July already? At over 80 degrees, I think this is about the warmest it's been (or the muggiest) this summer here, in the Upper Peninsula of Michigan.

The card above is from the SCS color Challenge today, to use Certainly Celery, Wild Wasabi, and Purely Pomegranite on the card. For the background, I used Wild Wasabi on retired "Linotype" on Certainly Celery. I love how it puts such a bold pattern on my paper. Then I selected the Artfully Asian Branch and stamped on White with the Wild Wasabi. I drew ink off the pad with my Aqua Painter to fill in the leaves. Then I stamped the floral dot posie images from the Three for You Punch Box Kit (Purely Pomegranite on Purely Pomegranite), and high-lighted the blossoms with a White Signo-Gel Pen.
Meanwhile, I used the Colluzle to cut 3 ovals, White and Wasabi were the same size and Pomegranite was a notch bigger. Then after I had stamped the branch, I used my Fiskars Cloud Scissors to go around the White paper with the floral image. When I use scallop scissors to go around a circle or an oval, I always start at the bottom of the image, because if it doesn't come out even, I can always camoflauge it with something, but in this case, I didn't mind the little bump at the bottom too much.
Then I took my flowers and the rounded end of a paintbrush (not the bristle end) and pushed the flowers into the palm of my hand to make those blossoms "cup." I glued them with Crystal Effects to the stem.
Next, I added my "much hoarded" Pomegranite Ribbon that was in the Mini Catalog last fall. I made a slit in the fold of the card and tied the ribbon around front of the card and knotted it. I am frugal with my supplies and often tape or glue ribbon on and trim the edges even, but this ribbon was just too yummy to not share some with the inside of the card. Once the knot is tied, I just trimmed the ends and moved the knot to where I wanted it and attached the oval next to the knot. Finally, I used my Poly-Mark Crystal Glitter (WalMart, with Craft Paints) under a buck) to add a dab of glitz to the flowers....voila...it was done!