Saturday, January 31, 2009
January Sheetload of Cards
Although I looked and studied the sketch early this month, I have just now finally made my cards and posted one. The sketch comes with photos of cards using this sketch, plus the cutting plans to cut each compnent the right size to do only one of or a set of eight...it's all right there and it's free...and you might even win something! What a great way to use up all those "extra" papers!
.
This card is very bright and cherry. I used Stampin' Up!'s "Pun Fun" for my images (I did 8 cards, using one stamp of everything but the jet and 2 latte cards. I used Green Galore and Pink Pirhouette for the solids, choosing them after I had decided which patterns I wanted to combine. Then I chose the stamps according to the size panel alotted for the card...although I could have chosen the image first and then cut my panels to fit; they give you the sketch as a pattern but we CAN take the scenic route if we want to! It's all about "artistic license!"
.
The ribbon I had...and the flowers were an afterthought as the sketch indicated a little something in that area. The coloring on the images was done with Prisma Pencils. I picked this set up almost a year ago, and have been dabbling with them here and there, I knew about Gamsol technique, but other than a dab here and a dab there I couldn't see what it would do.
.
But after coloring on the paper, I tried a timid interpretation of Gamsol with Oderless Mineral Spirits (what is used for the gamsel technique) to smooth out the pencil marks and it worked great! I don't have all the technicalities of this coloring style - but you will be hearing more about this from me. Okay, I'm turning in!
.
Goodnight!
Wednesday, January 28, 2009
Retirement Card
.
I began by printing out the wording for the invitation on full sized card stock and cutting that cardstock down to 8x5.25". Then I scored at 4" and creased the cards well to stay flat while I was stamping the truck image with Black Stazon. My dear husband was kind enough to do the detail striping down the sides of the truck...the first of his contributions on this project. Next, I cut a clear plastic mask that covered the truck while I tried brayering. The mask worked well and will remain in the set case for ever more, but the sky was "liney and then I remembered I had a sponge brayer I had never tried, and suddenly, the sky brightened! :)
.
Once again I cut another clear plastic image to sponge the grass...and added stamped tufts of grass for texture. Again, I stamped the truck on a clear template and cut out the tires, and sponged them with Basic Grey. (Are you tired of working on these yet? Uh-huh!) At this point, we gave the truck chrome (silver on the Painty-Pen) hub caps, fenders and headlights. Oh yes and Red Gel pen on the tail lights. The door decal had to be traced around a very small oval, and printed UPPCO (Upper Peninsula Power Company) and then hand cut out that oval and glued on.
.
Then came the trick of sponging on the dirt road holding a masking piece over the sky and the and a masking piece over the grass, and another over the truck. Also to be done was the stamp out the "celebrates" and cut them by hand (of course!) and glue them onto the the back of the truck...and hey! what are these little spots on the sky???? Okay, we'll stamp some smiley faces on the snow blossom punch and call it a sun...stick them on the spots, and add them where it looks good if there isn't any spots...oh yeah, and then glue all the green quarter sheets tot he cards! Is that all? Now, how many do we have to do???
.
What started out to be a simple invitation, turned into a regular marathon to get nearly 60 of these done before my family left Friday morning on a 5 day trip to help out my husband's brother and sister-in-law make the adjustment from hospital to home after my sister-in-law had a stroke as a result of brain surgery, 2 days before Thanksgiving.
.
She, Nancy, is doing amazingly well, and although she has alot of PT and work to do, she's a fighter and will do well. God has been very merciful to Nancy, and she has more ability, in spite of the severity of her stroke that even the doctors had hopes for, and a patient husband that would die trying to help her the best he can. I cooked up a bunch of meals ahead and went grocery shopping with my brother-in-law to help him figure out how to work in this area of the house-chores. My husband helped with hand-rails and other aids to help mobility within their home. She needs to do "laps" around the staircase (rooms go around in a way that you can go in a circle) Steve is going to encourage/bribe her with lattes. No, things will not likely ever be the same as they were, but life is still good and God is awesome!
C-ya later!
Saturday, January 24, 2009
Snap to It!
.
C-ya later!
Cheryl
Monday, January 19, 2009
NEW!!! Echoes of Kindness
I thought of this set as soon as I read the Technique Lovers Challenge on Splitcoast today...a technique that I used to do alot, several years ago...so I hopped right back to that technique and it's alot easier than it looks. Hence, here's a tutorial with my hints along the way.
.
First you want to raid your scrap pile. If you want to make tile, cut them on a cutter, use a punch, freehand cut (like I did) or tear. Such a great way to use up ALL your scraps!
.
***I use 2 sided carpet tape, that I use a great deal of, when I am card-making. Unless you're very lucky, you cannot usually remove a piece once you tape it. It's about an inch and a half wide, and you first stick it on your piece to glue on, and then peel the remaining backing off. It is a dollar at a dollar store for 47 feet, and if you can't find an easy method to peel the backing off, grab your Tupperware orange peeler and it'll flip it up for you. I would not recommend this wonder-tape for scrapbooking, as I am not sure of it's acidity.***
.
Stretch out a piece about 6 inches long to a lightweight sheet of paper. I used one width, but if you want wider, lay the tape lengths out, side by side with no gaps, so that you can peel up the tops without messing up the adjoining edges when you peel them.
.
Peel the top/tops off.
.
Put your little pieces all over the tape, leaving spaces between for the embosing powder to stick to (like the cement between bricks).
.
**Here is where I invented tools to help pick up those itty bitty pieces. Use your 2-Way glue on the end of a crochet hook, stylus or a pencil-end eraser. Let it dry for a few minutes and then you can pick up pieces and put them where you want them on the sticky stuff. So easy now!**
.
Fill in your area and then cover the in-between spaces with your embossing powder. Heat. Check after it has cooled for any spots you may have missed and re-heat those areas. It is easy to do, since you have so many edges to keep track of. Now cut down the mosaic to size and use on your card.
.
Let me know if you tried this!
.
On my card I used Pale Plum, Perfect Plum, Brocade Blue, Soft Sky, Almost Ametyst, and Not Quite Navy, White cardstock. Copper embossing powder. A touch of Pearl-Ex (over the tiles) and a the "Alligator" Cuttlebug embossing folder, and Nestabilities Ovals and Scallops, Watercolor Crayons.
Paper Roses Tole Card
Saturday, January 17, 2009
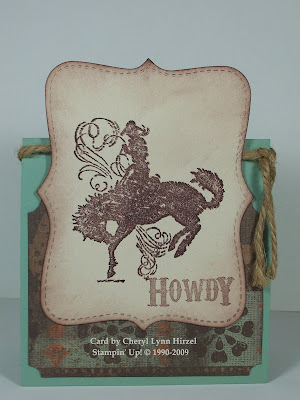
Howdy Cowboy
Howdy Strangers! I'm back to posting again after a few weeks of getting into the New Year routines...my DH was on vacation over the holidays and although he got a few things done around here, we mostly stayed around the homefires and sipped hot coffee. But it sure seemed I had lots to catch up on around here when he went back to work!...and this long stretch of a cold spell here in the UP has just about put me into hibernation! Maybe I'm getting old but it seems I can't warm up and stay warm like I used to. I've taken to wearing knee-high leather slippers and a knitted red shawl over my shoulders (when I'm not donning a bathrobe I use to help stay warm). Enough about the weather now, I know spring is c-c-c-c-c-oming...just seems alot further away than it did last year about this time. BRRRR!!!
This is a topper-card I did this week for my card camp. Featuring some of retiring sets, I had to have this set included in the class. Using the Top-Note BigShot die, I cut-out, stamped and sponged it to distress it, tied on the rope and set it over a piece of western pattern paper with clipped corners. ***The folded card base is 4 1/4" square, and I always do this style of card laying the base on an A-2 envelope, aligning the bottom edges of the card and envelope's side together. You will see where to attach the topper and still be able to fit it into the envelope, rather than make the card too long.***
That's it for tonight, I've got more cards to post tomorrow!
.
C-ya later!
Cheryl