Friday, August 29, 2008

Sock Monkey Swap Card

Here's my swap card that I gave at the "Stampin' in the U.P. of Michigan" weekend. Having just gotten Stampin' Up!'s new set Sock Monkey, I just had to play with it. I used Chocolate Chip to stamp Weathered background on So Saffron card stock. I stamped the monkey in Brown Stazon and watercolored him, The "ribbon" is actually strips cut from some K & Co. Designer Pattern Paper. Cupcake is backed with the 1 1/4", 1 3/8" circles and the Scallop Punch. Corners are punched out with the Corner Ticket Punch. I made a Sock Monkey when I was in High School...and have made a few over the years for the special children in my life when I am lucky enough to find the Rockford "Red Heel" Socks. The "smile" on the mouth is actually the heel of one sock...and the monkey's butt was the other heel, but not marked on the stamp, but it was easy to marker the color in place. I love this nostalgic set!

Stampin' in the U.P. of Michigan Challenge Cards

Three challenges were given at this weekend event, and here are 2 that I did third. The one above is a challenge by my friend Debbie (DeborahLynneS), who I grew up with and went to school with from kindergarten-first grade & on. Her challenge was to use acetate and she gave us a half sheet of this wonderful sturdy stuff. (I'll find out where she got it from if anyone asks). It is difficult to see that my card has the acetate stamped with the stems (Garden Silhouettes, retired) in Black Stazon, and overlaid the pattern paper with the greeting (Elegant Greetings, retired) on the underside. (I guess you could see it if you clicked on the card and examined the holes at the top.) I punched holes with my Cropadile and 'sewed' the pieces together with some narrow black ribbon I brought along, and then attached that to a neutral card base that I scalloped the bottom edge with my then fresh-outa-the-box Stampin' Up! Scalloped Edge Punch. There were many beautiful cards...obviously the ideas are unlimited with acetate.

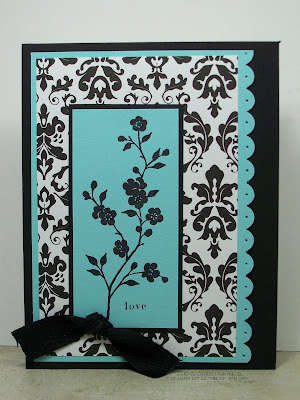
This other card was a challenge given by JoAnn (SarahZoe), who shares my hometown that I have gotten to know over the years. She gave us each a 6x6 square of black & white patern paper, and a half a sheet each of Basic Black, Whisper White, and Cool Carribbean, retired, along with a peice of black or white ribbon. All I used of my own was the Scalloped Edge Puncher, piercer and the Stem Silhouettes set, retired, and I loved this challenge! I even loved this card I did. What was the most amazing discovery for me, was how, when all our cards were put together, they looked like a huge set of elegant cards - all individually and uniquely beautiful, a gorgeous set...I'll look for a photo if someone else posted it, and link it here. They were all terrific!
The third challenge I didn't do a new card, as I was the one to throw out that challenge. My challenge was to use at least 2 different sizes of circles in a non-concentric design (not layered like a target) and so my sample card was one I posted here on July 17th.


Thursday, August 28, 2008

My Shoe Box Swap Cards


Our Stampin in the U.P. of Michigan get-together had a great turnout for all who came...and those of you who missed it, missed meeting alot of very nice, fun-to-be-with folks, and a great time too. Hope to see everyone next year, and those of you who missed it too! Truly, I stamped my heart out!
The ShoeBox Swap is a project box that each participant brings that has all the supplies needed for everyone else to each make one of your cards. You include instructions and samples in your box so swappers can pretty much follow the samples and instructions on their own...as we are all working on completing our cards. I have taken part in a few of these and always look forward to doing all the cards.
One issue I had with my shoebox swap card this year, is that I didn't have enough designer pattern paper to have everyone do the exact same card, so I had to do three sets with different papers and colors...hence, I had to also have 3 sample put together, and here they are, featuring one of my most favorite sets, Abundant Joy, which is retired :( Fortuneately, the instructions were the same for all three cards...but if you hang around here much, you will know that I love this style of a card.
More Later!


WT181 Sharpen Up Card Challenge

Today's challenge was to use my Colored Pencils anyway I wanted in the design of my card. I began with a brand new image from Eastern Influences, a new set from the new Fall and Winter 2008 Idea Book & Catalog. I had splurged last spring on a set of 120 Prisma Colored Pencils, and not having done much more than look at them and sharpen a few, today was definately the day to use them! I began by stamping the rose in Stazon Brown on Vanilla Card Stock and then colored in the image with just the yellow on the rose on the darkened areas, and 2 shades of greens on the leaves. Then I pulled out some stumps (think chipboard in the shape of pencils) which I dampened in ordorless Mineral Spirits to use to blend the colors together. The yellow seemed to all go to one color...maybe I didn't use enough contrast, or blended too long, but looked okay. The 2 greens blended nicely, and I was just getting into it, and it was done. I used a tan and a grey pencil to do the twig portion of the rose, and blended that too. (I just realized that you can see a close up if you click on the card picture!) The flower finished, I then tried to shade around behind it, and outlined the flower with a lavendar color (no idea why I chose it) and a blushy-colored thick sketching kind of thing past the lavendar. I blended them witht he Mineral Spirits too. Not sure if there was existing color left on the stumps before I blended the shading, but it passes for my first attempt. I chose Old Olive for the card base, to pick up from the leaves. Not being able to decide on a pattern paper or a background stamp, I used a Scor-Pal tool to make a dry-embossed lattice pattern over the entire card front. I used Choclate Chip card stock for the oval backs and some brown organdy ribbon, with the knot on the inside for an added touch of detail. The rose was cut out with a Scallop Oval Giga Punch with a Coluzzle Oval behind, and a large SU Oval for the phrase (from the new SU ''Best Yet" set). I backed the oval phrase with a scrap of brown that I cut around the oval with scalloped ProvoCraft scissors, to them in together. And there you have it!

Much Obliged

TLC183 Faux Dry Embossing Challenge

Tuesday's "Technique Lover's Challenge" challenge was to use Faux Dry Embossing on our cards. This was a new one for me, but one I would most likely try again with all the new silhouette sets in the new catalog begging to try them out out with this fun technique. It looked so easy that I grabbed the first scrap I found that fit the first set I grabbed (Bronc Buster by SU). I stamped the bronc with the White Craft Pad and let it dry real well. Then I used a Stampamajig to restamp Chocolate Chip Ink over it about a 1/16" above the white bronc. You want to line the stampamajig up exactly with the first image, and then slide it just a smidge north, which leaves you with the illusion that it is raised. I held the Stampamajig down very firm and actually stamped a few times before I was happy with the brown intensity overlaying the white. (If you a careful not to move the handle at all, you can do this many times!) I distressed the edges of the brown mat and the white confetti, and layered them together before attaching them to the 8 1/2" x 4 1/4" Really Rust card folded in half. The trick to making sure that this this fold of card will fit in the envelope properly is to lay the 4 1/4" x 4 1/4" on top (bottom edges together) of the invitation size A2 envelope and place the image piece so that it is within the limits of the envelope (top of card not longer than the envelope)I used the "Sanded" background and a Much Obliged (Club Stamp) sentiment that I also did a Faux Dry Embossed technique with. Having less success with this second attempt, I corrected it a bit more white onto the words with my wonderful White Signo Gel Pen from Stampin' Up. Hmmm...Faux-Faux Dry Embossed!

More Later!


Awesome August!


What a busy month it has been! I started the month off with the "Stampin' in the U.P. of Michigan" Stamper get-together in my beautiful hometown Baraga. Then my family and I were off for a week of Family Church Camp in the small community of Forest Junction WI. We got home from there and found all these wonderful new Stampin' Up! Fall & Winter 2008 Idea Book & Catalogs waiting on my front porch along with about 6 other boxes of stuff that had been delivered while I was gone. I spent a week catching up on laundry & mail and getting ready for the next big thing..."A Church in a Day" Project being prepared for by some dear friends of ours that have a Home Missions church they began in Hancock, MI about 4 years ago. Of course, with all the help they are going to get, I volunteered to make the 350 Thank You Cards they figured they would need, while I impatiently waited for my Stampin' Up! order with all the NEW stuff in it. Cards, got done, new stuff arrived, and I am revved up and ready to go! But, we are camping this weekend, and so I plan to bring stuff to "detail" with watercolors, pencils, you know... stamp the pictures and color/pierce/cutout at a picnic table. Then home and back to real life again, with the addition of starting my youngest daughter a Kindergarten Home Schooling. SO...now you know what I've been up to, still lots to catch up on - I have lots of cards (yes, I made a few while I've been on the run) to show you pictures and details, but I'll do a bit at a time and get caught up. I would apologize for being gone so long, but hey, we use electric blankets 11 months of the year, so when summer's here, we go with it!
August was Awesome!!!