Friday, February 27, 2009

Bluebird Blessings Card

I have been re-organizing all my little S&Fs into a pocket hanger, and I found this little piece of glossy cardstock with Polished Stone technique, so I thought I would see how glossy cardstock goes through my BigShot with a sizzlit. (wonderfully) You like?
.
I used the Marvy Mega and Giga Scalloped Oval Punches, CB Fine Vine folder, the SU Scallop Border Punch and the Graceful Words retired set from SU. One more note: I had to put scotch tape under the folded wing as a reinforcement because the glossy cardstock tended to crack and I didn't want to to break off, and the tape actually will help the wing pop up when it comes out of the envelope again.
.
Not having looked at other bird die-cut cards until after this one was finished, I now see that most people turn the wings to flap to the back, and not up and down...so this is a rare bird!
.
C-ya later!

"A Little Note" from my Secret Stamper!

I got this card the other day from my Michigan Mingle Secret Stamper and it is an adorable card! I love the colors and the images, and the more I looked at it the more I liked it. Something I have never tried (or thought of even) is to "cross the sacred boundary" of layering over the edges of the front quarter-sheet panel onto the card back (see the yellow flower panel positioned over the white edges of the card base?) It is perfect to draw the eye upward to the corner to where the butterflies are flying. Makes me happy to look at it! I love this card and thank you Secret Stamper for a wonderful box of goodies too!

Saturday, February 21, 2009

"Polka Dot Punches" Flower Card

Hello! Today I have a card that I made starting with a sketch that lost all meaning as I went along, and using punches to do alot of the work for me. "Polka Dot Punches" is one of the 6 selections offered for free with $50 orders made in Stampin' Up!'s annual Sell-a-Bration held in February and March.
.
Learning from a tutorial I found here using the Five Petal flower punch, and the matching stamp from the Polka Dot Punches set, I followed the tutorial and put the flower together. I made my leaves from punching the Large and Small Oval punches, folding them in half and then running them through my crimper. (Yes, I did end up snipping the round tips of leaves to make them pointed, but it was a good starting point.) I also used a crystal brad (from the Pretties Kit) for the center of the flower. The bottom strip of designer paper is from the Raspberry Tart collection with the Scalloped Border Punch on the bottom edge. The sentiment actualy came from another Sell-a-Bration set called Botanical Blooms, using the Large and Small Oval Punches for the framed effect.

Have a great weekend
and I'll c-ya later!


Monday, February 16, 2009

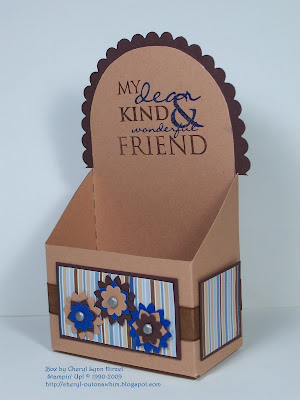
Round Topped Box Project

Good Morning!


I went to Splitcoast Stampers this morning and found the Technique Lover's Challenge for today was the template for this cute little box. I printed out the template on Creamy Carmel card stock, cut it out, decorated it with rest of the scraps leftover from an 8 card set of 3x3s that I made on Friday...to use some scraps! I love this little box - it was quick and easy and although I made it to fit the cards, it would work well to put a few cookies in it, make it into a "get well" package of a instant cup of chicken noodle soup, tissues and cough drops or Tylenol, or a little giftie trinket nesting in some paper shreds.
These are the 3x3 cards that I made last Friday (inspired by CarolineInToronto's cards), I used Stampin' Up!'s "Puns from the Past" and found the set to be very versatile and easy to spin out more ideas as I used them. The images work very well with a wide variety of SU's punches. This set was a gift to me from my good friend Theresa, and you can expect to see more of this set, as it is already a favorite of mine.
.
That's it for now!
C-ya later,
Cheryl


Wednesday, February 11, 2009

Trio of Cards from my Secret Stamper

This entry is featuring 3 cards I have gotten from my Secret Stamper in Michigan Mingle Group. I do not know who she is, so I can not give her the credit she deserves! (YET!) But, please leave comments for her on this entry, because I believe she did a fabulous job on all of them!
.
How I LOVE my coffee! Anyone who knows me knows that I practically live with a mug in my hand, from morning til bed-time. (Caffeine has never bothered me - unless I was pregnant, which then was doctored with milk and sugar to accomodate my changing cravings, LOL).
.
But I have a full cup cupboard for my ever changing fancies durring the day about which cup I feel like sipping out of...and this would be one I would grab for a morning-blend coffee. Great card and colors!


This pocket card sporting Spring colors (and I long for spring to get here!) has an adorable window filled with springy flowers, and the ribbon pull tag lifts the card from the pocket

See when it is lifted? Really very sweet!
Have you heard of the Michigan Mingle being held in Bay City Michigan? There's only a little more time to sign up, but you can read about it on http://www.splitcoaststampers.com/ under the forum label "Get it Together" on the spot called Michigan Mingle. For anyone who wants to attend, act quickly and let me know if you want to carpool - I'm driving from Baraga.


I think that this card is called a "squash card." Made from a 12x12" piece of beautiful cardstock (and I would love to know who makes such a heavy double-sided paper as this!). My Secret Stamper used the patterns on both sides to make a large 6x6 card with a unique fold and fun to open note inside. I am thinking I found the correct ribbon to put back through the holes in the bottom. My 4 year old daughter likes to "find" (read: "filch") things for her little stamping cubby, and this looked like a recent "finding" when I found it there! She has great taste!
Remember - please leave some comments for Secret Stamper's awesome cards.
C-ya Later Today!


Thursday, February 5, 2009

NO stamps here!


Here is a card I made today for a challenge and when I had finished and started noting what I had used in the process, I realized I had not used a single stamp!
.
Another 6x6" card - I seem to be on a roll here, and using K&Co Paper from the Blue Awning Pad. I guess the nice thing about using 12 x 12 paper is that I get 4 card fronts from each sheet.
.
Today's SCS "Ways to Use it" Challenge was to use a pile of embellishments...and so I started with a monogram chipboard letter that came white with a glitter pattern all over it, so I sponged a deep blue over it to get the white out of it. (warning: you will probably get glitter all over your pad! LOL). Next I used Brocade Blue and Night of Navy to die-cut my Nesties Scallop and Plain Ovals, at which time I had one of those AHA! moments.
.
***When cutting Nesties, I've been layering the top over a bottom piece. But today, I realized that if I were to die cut a frame for the back layer of my Nesties, I would also have a pre-cut smaller oval for another card...and there are times, when I am making my "sheetloads of cards," that I could end up with a stack of pre-cuts all ready for a future batch of cards! This can save me time and card stock and no one will ever even know the difference!***
.
The flowers were some I had here (odd-looking to have green in the centers, but I think they sorta go with the green on the Pattern Paper). After removing the plastic centers, I secured the blooms with rhinestone brads, and stuck a few "diamonds" over the navy organdy ribbon that runs under the oval. I
.
The last part to go on was a brass hummingbird. I liked the idea, but not the brass, so I grabbed my Gold & Silver Painty Pen and painted over the brass with the silver part of the pen and it dried quickly and I stuck it on...and done.
.
Have a great day and stay warm if you aren't already in the tropics!
Cheryl

Tuesday, February 3, 2009

Recessed Frame Challenge Card


This is the card I posted last night for SCS Techique Lover's Challenge to make a Recessed Frame Card. I could see what the directions were saying to instruct us to do, but tinkered with it and wasn't satisfied with how mine turned out. I then found a way to make it an easier task. If I had know it would have worked so well, I would have taken pictures along the way to show you - and as it seemed many had trouble, I am going to try to do another one and take pictures to post another attempt at a tutorial.
.
For this card, I used an image I did a while back from my "S&F box" that used the Heartfelt Thanks bachelor buttons stamped 3 times with the White Craft Pad and dusted with the Chalk Pastels. The edge was Faux Stitched and measured 4.25x2.5 inches. The designer paper (K&Co.) base I used is 6x6 inches. I also used a piece of HodgePodge brass for the "love you" frame, and a touch of ribbon. Getting that far, I decided to put my Martha Stewart Punch to use and make a lace border al the way around the card. I cut the lace edges straight off and filled in the gap with a 1/2" circle of matching paper to fill in the corners. I put a 6x6 (12x6 folded) base on the back and it works quite well to stand up on its own.. which was what I had hoped it would do, as it will be sent to my dear sister-in-law as an encouragement to her.
.
Please check back here later today for the tutorial! I just had my "vision" for what I am doing with my next card.
.
C-ya Later!
Cheryl